Brostrend Guide – Assistance for BrosTrend AC1200 Setup
Brostrend Guide delivers clear and streamlined self-help guides tailored for users who want to setup BrosTrend AC1200 fast. Whether you’re accessing the extender via re.brostrend.com, configuring dual-band connections, or resolving pairing failures, we provide technically accurate guidance in a simplified manner.
Need support beyond the basics? Our experts are available to address setup queries, firmware quirks, or performance drops.
How to Setup BrosTrend AC1200 Dual Band WiFi Extender?
Let’ learn BrosTrend AC1200 setup step-by-step. Explore the simple guide to understand its easy configuration process.
Introduction to BrosTrend AC1200 Dual Band WiFi Extender
The BrosTrend AC1200 is a plug-in WiFi range extender that boosts your existing network, so you get stronger, more stable internet in areas your router struggles to cover. It works on dual-band frequencies (2.4GHz and 5GHz), giving you both range and speed. It’s ideal for larger homes, thick-walled apartments, or just those weird spots where WiFi vanishes.
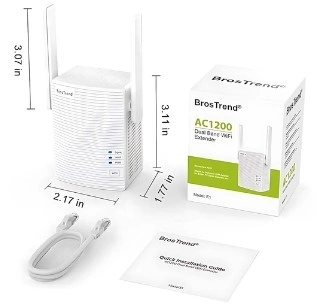
What’s in the Box?
Open it up and here’s what you’ll find:
- BrosTrend AC1200 Extender
- Quick installation guide
- Ethernet cable (optional for wired setups)
- A surprisingly polite “thank you” card
That’s it. No unnecessary wires or bulky gear.
Step 1: Choose the Right Spot
Plug the extender into a power outlet halfway between your router and the area with poor signal. Not too far, not too close. If you’re unsure, start by placing it somewhere with 2-3 signal bars from your main WiFi.
Step 2: Power It On
Plug it in and give it a minute. You’ll see the LED indicators start blinking. Wait until the Power LED turns solid.
Step 3: Connect Using WPS (The Fast Way)
This is the easiest method if your router has a WPS button.
- Press the WPS button on your router.
- Within 2 minutes, press the WPS button on the BrosTrend extender.
The 2.4GHz and 5GHz LEDs will blink and then stabilize once the connection is established. This means it successfully cloned your router’s signal.
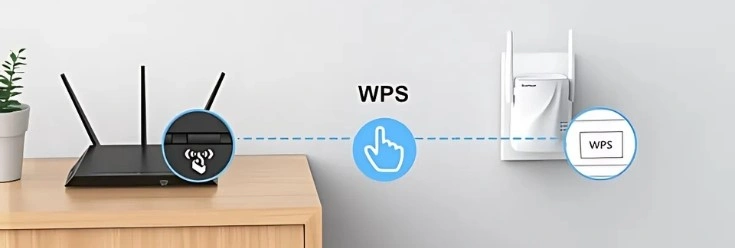
Pro Tip: If the 5GHz light doesn’t turn on, don’t sweat it-you might need to move the extender closer to the router or set it up manually (which we’ll cover next).
Step 4: Manual Setup via Browser
No WPS? No problem. Manual setup is still super easy.
- Plug in the extender.
- Connect your device (laptop, phone, tablet) to the “BrosTrend_EXT” WiFi network that appears.
- Open your browser and go to http://ap.setup or 192.168.0.254.

This takes you to the extender’s configuration page. No app download needed.
- Select your home WiFi network, enter your WiFi password, and hit connect.
- Name your extended network (or keep the default), then click finish.
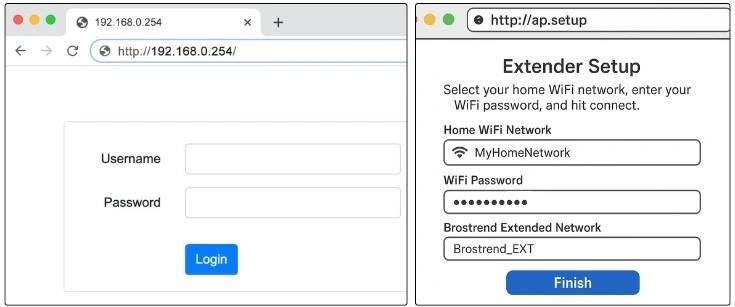
Boom. You’re done.
Understanding the LED Lights of Brostrend AC1200 Dual Band WiFi Extender
The LED indicators on the extender are your best friends that speak truth about your device. Here’s a quick breakdown:
- Solid Blue – Great signal strength
- Solid Red or No Light – Weak or no signal
- Blinking – Still trying to connect
- No LED at all? – Reboot the device or check the outlet
Using Ethernet Mode
If you’re planning to plug a gaming console, smart TV, or computer directly into the extender, the BrosTrend AC1200 has an Ethernet port for that. After it’s connected to your WiFi:
- Plug one end of the Ethernet cable into the extender.
- Plug the other into your device.
Now your wired device is online, using the extender’s wireless connection. Smooth, right?
Common Setup Issues
Let’s be honest—things don’t always go as planned. Here are a few hiccups people run into and how to fix them:
- “Can’t connect to extender network” – Try forgetting the network and reconnecting. Also, reboot the extender.
- “http://ap.setup doesn’t load” – Double-check you’re connected to the extender’s WiFi. Try using 192.168.0.254 instead.
- Extender doesn’t connect to WiFi – Move it closer to your router. It might be out of range.
- Slow speeds after setup – Connect to the 5GHz band if available. It’s faster and less congested.
Performance Tips
Once everything’s working, here’s how to get the best performance from your BrosTrend AC1200 WiFi Extender:
- Don’t hide it behind furniture or inside cabinets.
- Reboot it occasionally-yes, even extenders need a fresh start now and then.
- If you notice speed drops, consider updating Brostrend AC1200 firmware via the setup page.
BrosTrend AC1200 Review
The BrosTrend AC1200 is one of those devices that quietly saves the day. Once it’s set up, you’ll wonder how you ever lived with dead zones. Whether you’re gaming in the basement, streaming in the backyard, or working from the attic, this dual-band extender steps up your WiFi network.
FAQs
How to Change AC1200 Extender WiFi Password?
Access the BrosTrend AC1200 extender on your computer with the help of the IP address or Login URL. Select Settings > click SSID > change the password > SAVE it to apply settings.
How to Change AC1200 Extender WiFi Channels?
Log into the BrosTrend WiFi range extender via interface login credentials. Go into the settings > click Wireless Settings > choose Frequency channels > select one of the channels or both.
How to Change AC1200 Extender Admin Password?
You have to access the extender login interface via current admin username and password. Select the Settings option and choose the Administration tab. Change admin password and SAVE it to apply.
Where to Place the Extender in Your House?
You have to find the midpoint where the extender can still catch a decent signal from your router. Keep it out in the open, and keep it away from microwaves, cordless phones, baby monitors, and Bluetooth speakers